개발자의 오르막
[SpringSecurity #03] 스프링 시큐리티 테스트 코드 작성 본문
# 스프링 시큐리티 테스트 코드 작성
1. 먼저 스프링 시큐리티 테스트 의존성을 build.gradle 에 추가해준다.
testImplementation 'org.springframework.security:spring-security-test'

implementation 'junit:junit:4.12'
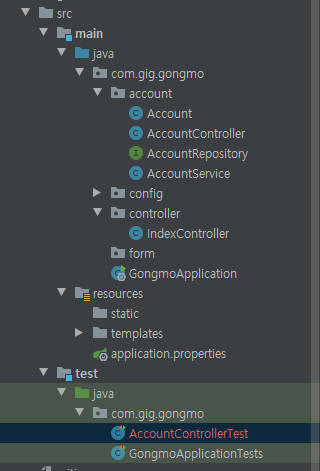
2. 아래와 같은 위치에 AccountControllerTest 를 만들어준다.

3. Junit 4 설정을 위해 아래와 같이 인텔리제이 설정을 바꿔준다.

4. 아래와 같이 어노테이션을 설정해 준다.
package com.gig.gongmo;

import org.junit.Test;
import org.junit.runner.RunWith;
import org.springframework.beans.factory.annotation.Autowired;
import org.springframework.boot.test.autoconfigure.web.servlet.AutoConfigureMockMvc;
import org.springframework.boot.test.context.SpringBootTest;
import org.springframework.test.context.junit4.SpringRunner;
import org.springframework.test.web.servlet.MockMvc;

import static org.springframework.test.web.servlet.request.MockMvcRequestBuilders.get;
import static org.springframework.test.web.servlet.result.MockMvcResultHandlers.print;
import static org.springframework.test.web.servlet.result.MockMvcResultMatchers.status;

@SpringBootTest
@RunWith(SpringRunner.class)
@AutoConfigureMockMvc
public class AccountControllerTest {

    @Autowired
    MockMvc mockMvc;

    @Test
    public void index_anonymous() throws Exception {
        mockMvc.perform(get("/")
                .with(anonymous()))
                .andDo(print())
                .andExpect(status().isOk());
    }

    @Test
    public void index_user() throws Exception {
        mockMvc.perform(get("/")
                .with(user("jake").roles("USER")))
                .andDo(print())
                .andExpect(status().isOk());
    }

    @Test
    public void admin_user() throws Exception {
        mockMvc.perform(get("/admin")
                .with(user("jake").roles("USER")))
                .andDo(print())
                .andExpect(status().isForbidden());
    }

    @Test
    public void admin_admin() throws Exception {
        mockMvc.perform(get("/admin")
                .with(user("admin").roles("ADMIN")))
                .andDo(print())
                .andExpect(status().isOk());
    }
}
이 때 주의할 점이 org.junit.Test 를 맞춰주는 것이다.
import org.junit.jupiter.api.Test; 로 import 가 되어있으면 테스트가 실행이 안된다.
위의 mockMvc 를 통해, get 메소드를 실행하여 status 코드 값이 ok 가 되었을 때
결과를 프린트 하라는 코드이다.
.with(user("jake").roles("USER") 메소드를 통해 해당 아이디로 로그인 되었을 때의 결과를 볼 수 있다.
이와 마찬가지로 IndexController 에서 했던 테스트를 테스트 코드를 통해 진행할 수 있다.
5. 테스트 코드에서 어노테이션 활용하기
    @Test
    @WithAnonymousUser
    public void index_anonymous() throws Exception {
        mockMvc.perform(get("/"))
                .andDo(print())
                .andExpect(status().isOk());
    }

    @Test
    @WithMockUser(username = "jake", roles = "USER")
    public void index_user() throws Exception {
        mockMvc.perform(get("/"))
                .andDo(print())
                .andExpect(status().isOk());
    }

    @Test
    @WithMockUser(username = "jake", roles = "USER")
    public void admin_user() throws Exception {
        mockMvc.perform(get("/admin"))
                .andDo(print())
                .andExpect(status().isForbidden());
    }

    @Test
    @WithMockUser(username = "admin", roles = "ADMIN")
    public void admin_admin() throws Exception {
        mockMvc.perform(get("/admin"))
                .andDo(print())
                .andExpect(status().isOk());
    }
위의 테스트 코드에서 썼던 .with 부분을 어노테이션으로 대체할 수 있다.
6. 또한 위의 계정 정보를 가진 meta Annotation 을 커스텀하여 만들 수 있다.
@Retention(RetentionPolicy.RUNTIME)
@WithMockUser(username = "jake", roles = "USER")
public @interface WithUser {
}
위처럼 WithUser 란 인터페이스를 생성한다.
@Test
@WithUser
public void index_user() throws Exception {
   	mockMvc.perform(get("/"))
    	.andDo(print())
        .andExpect(status().isOk());
}
이처럼 어노테이션을 사용만 하더라도 만들었던 계정정보를 사용할 수 있다.
7. form Login 기능 테스트 코드
    @Test
    @Transactional
    public void login_success() throws Exception {
        String username = "jake";
        String password = "123";

        Account user = this.createUser(username, password);
        mockMvc.perform(formLogin().user(user.getUsername()).password(password))
                .andExpect(authenticated());
    }

    @Test
    @Transactional
    public void login_fail() throws Exception {
        String username = "jake";
        String password = "123";

        Account user = this.createUser(username, password);
        mockMvc.perform(formLogin().user(user.getUsername()).password("12345"))
                .andExpect(unauthenticated());
    }

    private Account createUser(String username, String password) {
        Account account = new Account();
        account.setUsername(username);
        account.setPassword(password);
        account.setRole("USER");
        accountService.createNew(account);
        return account;
    }
FormLogin 에 대한 테스트 코드이다.
login_success() 테스트를 보면, 화면에서 입력받은 username, password 를 입력받고,
이를 accountService.createNew 를 활용하여 회원가입을 시킨다.
이후 해당 username, password 를 통해 formLogin 을 했을 때의 결과를 볼 수 있다.
'SpringFrameWork > SpringSecurity' 카테고리의 다른 글
| [SpringSecurity #06] 스프링 시큐리티 Filter와 FilterChainProxy (0) | 2020.09.27 |
|---|---|
| [SpringSecurity #05] Authentication 와 SecurityContextHolder (0) | 2020.09.27 |
| [SpringSecurity #04] SecurityContextHolder 와 Authentication (0) | 2020.09.21 |
| [SpringSecurity #02] 스프링 시큐리티 JPA 연동 (0) | 2020.09.20 |
| [SpringSecurity #01] 스프링 시큐리티 개발환경 구성 및 사용방법 (0) | 2020.09.20 |


