
개발자의 오르막
[SpringSecurity #01] 스프링 시큐리티 개발환경 구성 및 사용방법 본문
# 스프링 시큐리티 개발환경 설정 방법
1. 인텔리제이 -> New Project의 Spring initializer 를 통해 프로젝트를 생성한다.

-> 이때, Java , SDK, 프로젝트 명을 설정해준다.
2. 프로젝트의 기본 Defendency를 설정해주고, Security 를 포함시킨다.

- 이때, JPA, MySQL, 등은 데이터베이스 환경이 설정 된 후에 Defendency 에 추가하자..
3. build.gradle 에서 defendency 부분에 아래와 같은 gradle이 들어가있는지 확인한다.
implementation 'org.springframework.boot:spring-boot-starter-security'
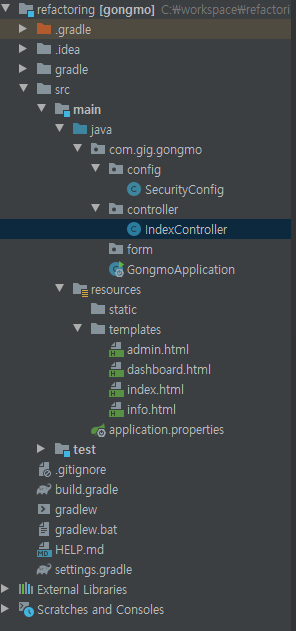
4. 프로젝트의 기본 패키지 트리를 생성한다. 이때 SecurityConfig 파일이 시큐리티 설정 파일이다.
5. Security 의 기능을 확인하기 위해 아래와 같은 IndexController 를 만들어준다.
package com.gig.gongmo.controller;

import org.springframework.stereotype.Controller;
import org.springframework.ui.Model;
import org.springframework.web.bind.annotation.GetMapping;

import java.security.Principal;

@Controller
public class IndexController {

    @GetMapping("/")
    public String index(Model model, Principal principal) {
        if (principal == null) {
            model.addAttribute("message", "Hello Spring Security");
        } else {
            model.addAttribute("message", "Hello" + principal.getName());
        }

        return "index";
    }

    @GetMapping("/info")
    public String info(Model model) {
        model.addAttribute("message", "Info");
        return "info";
    }

    @GetMapping("/dashboard")
    public String dashboard(Model model, Principal principal) {
        model.addAttribute("message", "Hello" + principal.getName());
        return "dashboard";
    }

    @GetMapping("/admin")
    public String admin(Model model, Principal principal) {
        model.addAttribute("message", "Hello Admin, " + principal.getName());
        return "admin";
    }
}
- Principal 객체는 인증여부를 알려주는 객체이다.
쉽게 말해 로그인 한 객체 정보인데, 로그인 한 객체의 정보를 확인할 수 있다.
우리는 index 를 통해 로그인 여부에 따른 정보의 변화와
info 를 통해 로그인 없이 이동할 수 있는 지의 여부,
dashboard 를 통해 로그인 한 사람의 정보
admin 을 통해 Role 에 따른 페이지 접근 여부
를 알 수 있다.
6. 화면은 각각의 message를 표현하고, 화면 이름만 알 수 있게 만들어준다.
<!DOCTYPE html>
<html lang="en" xmlns:th="http://www.thymeleaf.org">
<head>
    <meta charset="UTF-8">
    <title>index</title>
</head>
<body>
    <h1 th:text="${message}">Hello</h1>
</body>
</html>
7. SecurityConfig 파일에 아래와 같은 어노테이션을 붙이고, WebSecurityConfigureAdapter 를 상속받는다.
package com.gig.gongmo.config;

import org.springframework.context.annotation.Configuration;
import org.springframework.security.config.annotation.web.builders.HttpSecurity;
import org.springframework.security.config.annotation.web.configuration.EnableWebSecurity;
import org.springframework.security.config.annotation.web.configuration.WebSecurityConfigurerAdapter;

@Configuration
@EnableWebSecurity
public class SecurityConfig extends WebSecurityConfigurerAdapter {

    @Override
    protected void configure(HttpSecurity http) throws Exception {
        super.configure(http);
    }

}
- 상속받은 클래스의 configure 메소드를 Override를 한다.
8. 위의 SpringSecurity 환경설정을 커스텀을 한다.
@Configuration
@EnableWebSecurity
public class SecurityConfig extends WebSecurityConfigurerAdapter {

    @Override
    protected void configure(HttpSecurity http) throws Exception {
        http.authorizeRequests()
                .mvcMatchers("/", "/info").permitAll()
                .mvcMatchers("/admin").hasRole("ADMIN")
                .anyRequest().authenticated()
                .and()
            .formLogin()
                .and()
            .httpBasic();
    }

}
- http.authorizeRequests() : http로부터 request 를 받을때,
- mvcMatchers("/", "/info").permitAll() : Url 이 "/", "/info" 로 들어올 때 권한을 모두 허용한다.
- mvcMatchers("/admin").hasRole("ADMIN") : /admin 으로 들어올 때 ADMIN 이란 권한이 필요하다.
- anyRequset().authenticated() : 어떤 요청이 들어오더라도 (위 제외) 인증이 필요하다.
- formLogin() : security 가 제공하는 기본적인 로그인 화면, 로그인 기능, 로그아웃 기능을 제공한다.
9. Application 을 실행한다.
-> index, info 는 시큐리티 인증 없이 접속이 가능한 것을 확인 할 수 있다.
-> /login 으로 들어가면 아래와 같은 로그인 폼이 나타난다. (시큐리티에서 기본적으로 제공)

- 이때 console 창에 나타난 비밀번호를 입력한다.
-> 로그인에 성공하면 index 창에 로그인한 객체의 name 이 데이터로 보여진다.
그러나 아직 우리는 로그인 유저의 Role 에 따른 admin 페이지 접근을 구현하지 않았다.
이 부분은 시큐리티 설정의 Custom 이 필요하다.
로그 창에 비밀번호를 알려주던 클래스 이름인 UserDetailsServiceAutoConfiguration 이 있다.
package org.springframework.boot.autoconfigure.security.servlet;


@Configuration(proxyBeanMethods = false)
@ConditionalOnClass(AuthenticationManager.class)
@ConditionalOnBean(ObjectPostProcessor.class)
@ConditionalOnMissingBean(
		value = { AuthenticationManager.class, AuthenticationProvider.class, UserDetailsService.class },
		type = { "org.springframework.security.oauth2.jwt.JwtDecoder",
				"org.springframework.security.oauth2.server.resource.introspection.OpaqueTokenIntrospector" })
public class UserDetailsServiceAutoConfiguration {

	private static final String NOOP_PASSWORD_PREFIX = "{noop}";

	private static final Pattern PASSWORD_ALGORITHM_PATTERN = Pattern.compile("^\\{.+}.*$");

	private static final Log logger = LogFactory.getLog(UserDetailsServiceAutoConfiguration.class);

	@Bean
	@ConditionalOnMissingBean(
			type = "org.springframework.security.oauth2.client.registration.ClientRegistrationRepository")
	@Lazy
	public InMemoryUserDetailsManager inMemoryUserDetailsManager(SecurityProperties properties,
			ObjectProvider<PasswordEncoder> passwordEncoder) {
		SecurityProperties.User user = properties.getUser();
		List<String> roles = user.getRoles();
		return new InMemoryUserDetailsManager(
				User.withUsername(user.getName()).password(getOrDeducePassword(user, passwordEncoder.getIfAvailable()))
						.roles(StringUtils.toStringArray(roles)).build());
	}

	private String getOrDeducePassword(SecurityProperties.User user, PasswordEncoder encoder) {
		String password = user.getPassword();
		if (user.isPasswordGenerated()) {
			logger.info(String.format("%n%nUsing generated security password: %s%n", user.getPassword()));
		}
		if (encoder != null || PASSWORD_ALGORITHM_PATTERN.matcher(password).matches()) {
			return password;
		}
		return NOOP_PASSWORD_PREFIX + password;
	}

}
- InMemoryUserDetailsManager 메소드의 SecurityProperties 파라미터를 보면,
로그인 유저의 name, password, roles 등 의 정보가 명시되어있음을 알 수 있다.
여기에 등록된 정보들을 기준으로 우리가 로그인을 할 수 있었다.
실제로 application.properties 에 아래와 같은 정보를 입력하면 admin 으로 로그인이 가능하다.
spring.security.user.name=user
spring.security.user.password=123
spring.security.user.roles=ADMIN
그러면 우리는 1명의 로그인 유저가 아닌 복수의 유저가 로그인이 가능하도록 설정을 해야한다.
우리는 다시 SecurityConfig 클래스에서 Override 를 사용하여 인메모리 유저 설정을 해준다.
@Override
    protected void configure(AuthenticationManagerBuilder auth) throws Exception {
        auth.inMemoryAuthentication()
                .withUser("jake").password("{noop}123").roles("USER")
                .and()
                .withUser("admin").password("{noop}!@#").roles("ADMIN");
    }
- 위의 {noop} 은 인코딩 설정을 하지 않는 다는 것을 의미한다.
이 설정이 들어가면 이제 우리는 기본적으로 제공되었던 user 계정 정보는 사용하지 않게 되고,
위의 설정의 정보들로만 로그인하게 된다.
'SpringFrameWork > SpringSecurity' 카테고리의 다른 글
| [SpringSecurity #06] 스프링 시큐리티 Filter와 FilterChainProxy (0) | 2020.09.27 |
|---|---|
| [SpringSecurity #05] Authentication 와 SecurityContextHolder (0) | 2020.09.27 |
| [SpringSecurity #04] SecurityContextHolder 와 Authentication (0) | 2020.09.21 |
| [SpringSecurity #03] 스프링 시큐리티 테스트 코드 작성 (0) | 2020.09.20 |
| [SpringSecurity #02] 스프링 시큐리티 JPA 연동 (0) | 2020.09.20 |


