
개발자의 오르막
SpringBoot REST 기반 파일 업로드 본문
@PostMapping("/storeRegist")
public String resgisterPost(
	@ModelAttribute("storeVO")Store storeVO,
   	@ModelAttribute("rewardVO")Reward rewardVO,
	@RequestParam("id") Long id,
	@RequestParam("file1")MultipartFile file1)

    return "";
}
원래 나는 REST 방식이 아닌, 일반 컨트롤러에서 POST 방식으로 파일 업로드를 진행하였다.
하지만 팝업창에서, 정보를 전송하고, 전송에서 성공했을 때 창을 닫고, 부모 창을 reload하고
싶었음으로, REST 기반의 방식으로 파일 업로드를 진행하고자 한다.
- 기본 설정이 필요한 pom.xml
<dependencies>

        <dependency>
            <groupId>org.springframework.boot</groupId>
            <artifactId>spring-boot-starter-thymeleaf</artifactId>
        </dependency>

        <!-- hot swapping, disable cache for template, enable live reload -->
        <dependency>
            <groupId>org.springframework.boot</groupId>
            <artifactId>spring-boot-devtools</artifactId>
            <optional>true</optional>
        </dependency>

        <dependency>
            <groupId>org.webjars</groupId>
            <artifactId>jquery</artifactId>
            <version>2.2.4</version>
        </dependency>

    </dependencies>

    <build>
        <plugins>
            <!-- Package as an executable jar/war -->
            <plugin>
                <groupId>org.springframework.boot</groupId>
                <artifactId>spring-boot-maven-plugin</artifactId>
            </plugin>
        </plugins>
    </build>
그럼 차근차근, 화면단에서부터 정보 전송에 대해 알아보자.
# View
<!DOCTYPE html>
<html xmlns:th="http://www.thymeleaf.org">
<body>

<h1>Spring Boot - Multiple file upload example - AJAX</h1>

<form method="POST" enctype="multipart/form-data" id="fileUploadForm">
    <input type="text" name="extraField"/><br/><br/>
    <input type="file" name="file"/><br/><br/>
    <input type="submit" value="Submit" id="btnSubmit"/>
</form>

<script type="text/javascript"
        src="webjars/jquery/2.2.4/jquery.min.js"></script>

<script type="text/javascript" src="js/ajaxupload.js"></script>

</body>
</html>
# ajaxLoadFile.js
$(document).ready(function () {

    $("#btnSubmit").click(function (event) {

        //stop submit the form, we will post it manually.
        event.preventDefault();
        var extraField = $("input[name='extraField']").val();
        alert(extraField);
        fire_ajax_submit(extraField);

    });

});

function fire_ajax_submit(extraField) {

    // Get form
    var form = $('#fileUploadForm')[0];

    var data = new FormData(form);
    alert(extraField);
    data.append("extraField", extraField);

    $("#btnSubmit").prop("disabled", true);

    $.ajax({
        type: "POST",
        enctype: 'multipart/form-data',
        url: "/api/upload/multi",
        data: data,
        //http://api.jquery.com/jQuery.ajax/
        //https://developer.mozilla.org/en-US/docs/Web/API/FormData/Using_FormData_Objects
        processData: false, //prevent jQuery from automatically transforming the data into a query string
        contentType: false,
        cache: false,
        timeout: 600000,
        success: function (data) {

            $("#result").text(data);
            console.log("SUCCESS : ", data);
            $("#btnSubmit").prop("disabled", false);

        },
        error: function (e) {

            $("#result").text(e.responseText);
            console.log("ERROR : ", e);
            $("#btnSubmit").prop("disabled", false);

        }
    });

}
# Controller
@PostMapping("/api/upload")
public void uploadFile(
     @RequestParam("file") MultipartFile uploadfile,
     @RequestParam("extraField") String extraField) {

     logger.debug("Single file upload!");
     logger.debug(extraField);

}
우선 구글링을 통해 ajax를 통한 파일 업로드 예제를 찾았다. 그리고 내 프로젝트에 붙이기 위해
화면단에서 컨트롤러까지 정보전송이 잘 되는지 확인했다.
간결화된 위의 컨트롤러를 통해 file과 Text 내용이 잘 전달되는 것을 확인 할 수 있었다.

그럼 이제 원래의 프로젝트인 리뷰 정보를 ajax를 통해 파일업로드를 해보도록 하겠다.
# View
<form method="POST" enctype="multipart/form-data" id="fileUploadForm">
		<input type="hidden" name="storeNum" th:value="${vo.storeNum}">
		<input type="hidden" id="checkRate">
        <input type="hidden" id="filename" name="filename">
		<input type="hidden" id="writer" name="writer" th:value="${session.memberVo.uemail}">

		<div id="storeRate"></div>
		<div id="write_reply">
			<ul id="storeInfor" style="padding-left: 0px;">
				<li id="storeName"># [[${vo.storeName}]]</li>
				<li class="borderIcon" style="float: right;" value="-1">
                	<img src="../images/common/bad.png"></li>
				<li class="borderIcon" style="float: right;" value="0">
                	<img src="../images/common/soso.png"></li>
				<li class="borderIcon" style="float: right;" value="2">
                	<img src="../images/common/good.png"></li>
			</ul>
		<div id="write_replyInput">
			<div id="write_replyContent">
				<div id="textBox">
					<div class="line"></div>
					<input type="text" id="write_txt_reply" name="reviewTitle" class="reply_event" placeholder="제목을 입력해주세요.">
					<textarea name="reviewContent" placeholder="내용을 입력해주세요."></textarea>
				</div>
			</div>
		<div id="imgBox"></div>
		<div id="write_replyButton">
			<ul>
				<li id="imgIcon"><input type="file" id="file" name="file">
                	<span class="glyphicon glyphicon-picture" style="font-size: 25px;"></span></li>
				<li style='float: right;'><input type="button" id='btnSubmit' value="작성완료"></li>
			</ul>
		</div>
		</div>
		</div>
</form>
- View 단에서 조심해야 할 부분은 form 태그의 method, enctype, id 부분을 조심해야 한다.
- 이 뷰단에서는 세션값과 storeNum, storeName 값을 받아오기 때문에
GET 방식으로 해당 정보들을 잘 가져오는지 확인해야 한다.
<script th:src="@{/js/review/ajaxupload.js}"></script>- Tyemeleaf 프레임워크를 쓰고 있기 때문에, 각 EL 표현식과 스크립트를 올바르게 가져오는지 확인해야 한다.
# Script 부분
function fire_ajax_submit(review, storeNum) {
    // Get form
    var form = $('#fileUploadForm')[0];

    var data = new FormData(form);

    $("#btnSubmit").prop("disabled", true);

    $.ajax({
        type: "POST",
        enctype: 'multipart/form-data',
        url: "/review/register/",
        data: data,
        //http://api.jquery.com/jQuery.ajax/
        //https://developer.mozilla.org/en-US/docs/Web/API/FormData/Using_FormData_Objects
        processData: false, //prevent jQuery from automatically transforming the data into a query string
        contentType: false,
        cache: false,
        timeout: 600000,
        success: function (data) {
        	opener.parent.location.reload();
        	window.close();
        },
        error: function (e) {
            alert("실패");
        }
    });
}
- 따로 append 를 할 필요없이 아래의 코드를 통해 form 변수에 모든 값들을 저장했다.
var form = $('#fileUploadForm')[0];그리고 url에 /review/register 를 통해 각각의 정보들을 모두 post 방식으로 전송 후,
성공했을 때, 부모창은 reload(), 팝업창은 닫기 이벤트를 진행했다.
# domain
@Getter
@Setter
@Entity
@Table(name = "tb_review")
@EqualsAndHashCode(of="reviewNum")
@ToString(exclude="store")
public class Review {

	@Id
	@GeneratedValue(strategy = GenerationType.IDENTITY)
	private Long reviewNum;

	private String reviewTitle;

	private String reviewContent;

	private String filename;

	private String reviewWriteTime;

	private String visitDate;

	private int storeRate;

	private String writer;

	@JsonIgnore
	@ManyToOne(fetch=FetchType.LAZY)
	private Store store;

}
# Repository
public interface ReviewRepository extends CrudRepository<Review, Long>{

}
# RestController
@PostMapping("/register")
    public void uploadFile(
            @RequestParam("file") MultipartFile uploadfile,
            @RequestParam("storeNum") Long storeNum,
            @ModelAttribute("review")Review review
    		) {
        log.info(uploadfile.toString());

        Optional<Store> opStore = storeRepo.findById(storeNum);
        review.setStore(opStore.get());

		reviewRepo.save(review);
		s3Uploader.uploadfile(uploadfile);

    }
- 주의할 부분은 Controller 가 아닌 RestController 에서만 진행되었다는 점이다.
- 하나의 도메인에 필드에 속하는 값들은 @ModelAttribute를 통해 자동적으로 매핑이 된다.
- Controller 와 RestController 의 차이점과 사용가능한 어노테이션 복습이 필요하다.
# 결과

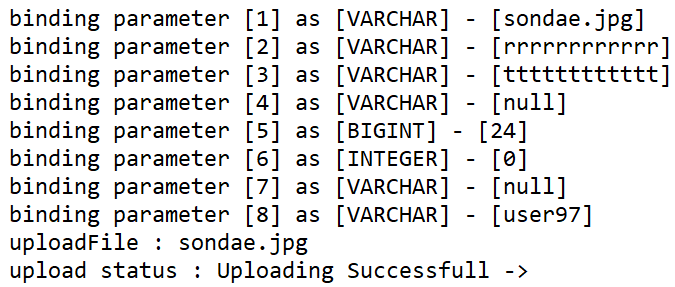
- 콘솔창을 통해 쿼리와 파라미터 값이 정상적으로 동작했음을 알 수 있다.
'SpringFrameWork > SpringBoot' 카테고리의 다른 글
| [SpringBoot] Page 란? (0) | 2019.11.30 |
|---|---|
| SpringBoot 쿼리 메소드 사용하기 (0) | 2019.11.30 |
| Spring Boot JPA Query (0) | 2019.10.08 |
| [Spring Boot + JPA ] DomainClassConvert, Pageable (0) | 2019.10.08 |
| Spring Boot + REST API 개념부터 설계까지 (0) | 2019.10.08 |
